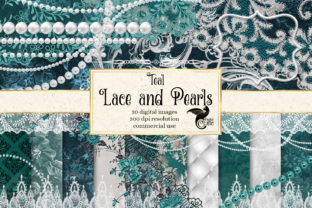
Elevating Your Designs with Teal Lace and Pearls Graphics
There is a distinct elegance that comes from combining vintage textures with delicate details, a style that instantly transforms a simple project into something memorable. The Teal Lace and Pearls Graphics collection captures this aesthetic perfectly, offering creators a robust toolkit for card making, scrapbooking, and custom invitations. Whether you are a seasoned professional designer or a hobbyist looking to add a touch of sophistication to your next DIY project, understanding how to leverage these digital assets effectively is key. This instant download kit is not just a folder of images; it is a curated set of thirty high-resolution elements designed to streamline your workflow while ensuring premium output quality.
Before diving into your next creative endeavor, it is important to recognize that having high-quality assets is only half the battle. Many users, even experienced ones, often overlook critical technical details when integrating digital kits like this into their projects. These oversights can lead to frustrating results, such as pixelated prints or designs that feel disjointed rather than cohesive. By addressing common misunderstandings early, you can ensure that the beautiful aqua, blue, and brown textures in this collection shine exactly as intended.
Avoiding Resolution Pitfalls in Print Projects
One of the most frequent mistakes creators make involves ignoring file specifications until it is too late. This Teal Lace and Pearls Graphics kit provides backgrounds measuring 12 x 12 inches (30.48 cm) at a crisp 300 DPI. While this sounds straightforward, beginners often resize these images incorrectly within their design software, inadvertently lowering the resolution and causing blurry prints. When you stretch a raster image beyond its intended dimensions, you lose the sharpness that makes the burlap, old paper, and brushed velvet textures look authentic.
To avoid this, always check your canvas settings before importing the JPG backgrounds. If you are designing a standard invitation or a scrapbook page, stick to the native 12x12 size or scale down, never up. For those needing larger formats, consider tiling the texture or using it as a localized element rather than stretching it across a poster-sized layout. Remember, the value of this kit lies in its print-ready quality; preserving that 300 DPI standard ensures your final product looks professional, whether it is a wedding invite or a marketing flyer for a boutique business.
Mastering Layering with Transparent Overlays
The collection includes six white and aqua lace overlays in PNG format with transparent backgrounds. A common error here is treating these overlays as static images rather than dynamic design layers. Some users place them directly over busy sections of the background without adjusting opacity, which can make the text underneath unreadable or the design feel cluttered. The goal of using lace is to add depth and romance, not to obscure your message.
A better approach is to experiment with blending modes and opacity levels. Try setting the lace overlay to "Multiply" or "Overlay" depending on your background color to create a seamless integration. If you are placing text over the aqua lace, ensure there is sufficient contrast. You might need to add a subtle drop shadow to your typography or place a semi-transparent shape behind the text box. These small adjustments prevent the "floating text" effect and ground your design, making it look intentional and polished.
Strategic Use of Frames and Dividers
Included in this set are two white pearl frames and a matching divider, along with ten distinct pearl strands. A significant misunderstanding occurs when designers force these elements to fit spaces they were not meant for. The pearl frames measure approximately 5 inches in width, and the divider is about 4 inches wide. Attempting to stretch these vector-style PNGs to fit a full-page border will result in distortion, making the pearls look oval and unrealistic.
Instead, use these elements for their intended purpose: accentuation. The pearl frames are perfect for highlighting a central photo in a scrapbook layout or framing the date on a save-the-date card. The divider works best to separate sections of text in an invitation suite or to break up content in a digital blog post. The ten pearl strands, measuring 12 inches in diameter, offer flexibility for creating circular arrangements or draping effects. By respecting the original proportions of these graphics, you maintain the illusion of three-dimensional realism that makes pearls so appealing in graphic design.
Color Harmony and Texture Coordination
The background textures in this kit feature a sophisticated palette of vintage aqua, blue, and brown. A frequent misstep is clashing these tones with incompatible fonts or additional clip art. Because the textures include burlap, old paper, and floral lace, they carry a specific vintage mood. Pairing them with neon colors or ultra-modern, geometric sans-serif fonts can create a jarring visual conflict that confuses the viewer.
To achieve a harmonious look, select typography that complements the vintage vibe. Script fonts or classic serifs often work best with the Teal Lace and Pearls Graphics theme. Additionally, when mixing the brown burlap with the aqua lace, ensure your color balance feels natural. Use the brown tones to ground the design and the aqua to provide a fresh, airy contrast. This thoughtful coordination enhances the overall presentation and communicates a clear brand identity or emotional tone to your audience.
- Check File Formats: Ensure your software supports PNG transparency for the overlays and frames to avoid unwanted white boxes around your elements.
- Verify Dimensions: Always confirm the inch and centimeter measurements against your project requirements before starting the layout.
- Test Prints: Run a test print on the same paper stock you intend to use for the final product to see how the velvet and paper textures render physically.
- Organize Assets: Keep the 30 images organized in folders by type (backgrounds, overlays, frames) to speed up your workflow and reduce search time.
Ultimately, the success of your project depends on how well you understand the tools at your disposal. This digital scrapbooking kit offers immense versatility, but it rewards those who pay attention to detail. By avoiding common technical errors and approaching the design process with a strategy that respects the integrity of the graphics, you can produce work that stands out. Whether you are creating a heartfelt family heirloom or a commercial product for sale, the Teal Lace and Pearls Graphics collection provides the foundation for excellence. Take the time to plan your layers, respect the resolution limits, and let the vintage charm of these textures elevate your creative vision.